


🔥 git add
개발자가 작업한 파일을 Git의 스테이징 영역(Staging Area)에 추가하려면 git add 명령어를 사용합니다. 이렇게 하면 변경된 파일을 커밋할 준비가 되지요.
예를 들어, 현재 디렉토리에 example.txt 파일을 새로 생성했다고 가정해 봅시다. 이 파일을 스테이징 영역에 추가하려면 아래와 같이 명령어를 실행하면 됩니다.
$ touch example.txt
git add example.txt$ touch example.txt
git add example.txt또는 현재 디렉토리의 모든 변경 사항을 한 번에 추가하고 싶다면 아래와 같이 .을 사용할 수 있습니다.
git add .git add .git add 명령어는 다양한 옵션을 제공합니다. 예를 들어:
p: 변경된 파일의 특정 부분만 선택적으로 추가할 수 있습니다.u: 이미 추적 중인 파일의 변경 사항만 추가합니다.A: 새로운 파일, 수정된 파일, 삭제된 파일 모두를 추가합니다.
실제로 git add를 사용해 보겠습니다. 먼저 새로운 파일을 생성하고 내용을 추가해 보죠.
echo "Hello, Git!" > greeting.txtecho "Hello, Git!" > greeting.txt그리고 git status 명령어로 현재 상태를 확인해 보면:
On branch main
Your branch is up to date with 'origin/main'.

Changes to be committed:
  (use "git restore --staged <file>..." to unstage)
        new file:   example.txt

Untracked files:
  (use "git add <file>..." to include in what will be committed)
greeting.txtOn branch main
Your branch is up to date with 'origin/main'.
Changes to be committed:
(use "git restore --staged <file>..." to unstage)
new file: example.txt
Untracked files:
(use "git add <file>..." to include in what will be committed)
greeting.txt새로 생성한 greeting.txt 파일이 "Untracked files"에 있는 것을 확인할 수 있습니다. 이제 git add로 이 파일을 스테이징 영역에 추가해 봅시다.
git add greeting.txtgit add greeting.txt다시 git status를 실행하면:
$ git status
On branch main
Your branch is up to date with 'origin/main'.

Changes to be committed:
  (use "git restore --staged <file>..." to unstage)
        new file:   example.txt
new file: greeting.txt$ git status
On branch main
Your branch is up to date with 'origin/main'.
Changes to be committed:
(use "git restore --staged <file>..." to unstage)
new file: example.txt
new file: greeting.txtgreeting.txt가 "Changes to be committed"로 이동한 것을 볼 수 있습니다. 이제 이 파일은 커밋할 준비가 된 것이지요.
이처럼 git add 명령어를 사용하면 작업한 변경 사항을 손쉽게 스테이징 영역에 추가할 수 있습니다. 개발자는 git add로 커밋할 파일들을 선택한 뒤 git commit으로 변경 사항을 커밋하게 됩니다.
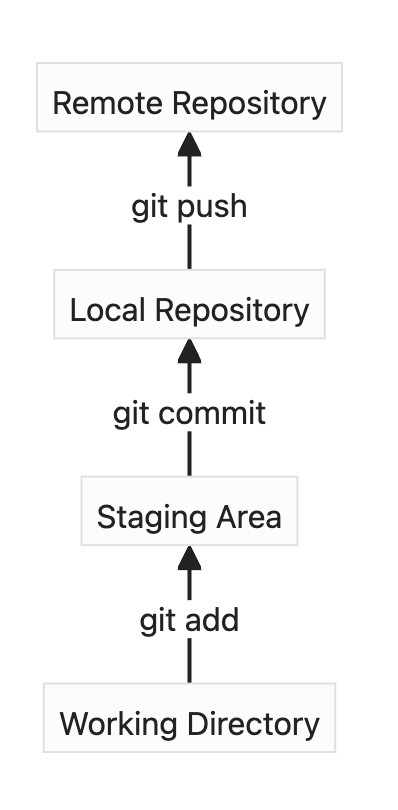
위의 다이어그램은 Git의 전체 작업 흐름을 보여주고 있습니다.
git add로 Working Directory의 변경 사항을 스테이징 영역에 추가하고,git commit으로 스테이징 영역의 내용을 Local Repository에 반영한 뒤,git push를 사용하여 Local Repository의 커밋을 Remote Repository로 전송합니다.
개발자는 이 과정을 반복하면서 코드의 변경 사항을 관리하게 되는데요. git add와 git commit으로 의미 있는 변경 사항을 잘 정리하고, git push로 협업하는 팀원들과 공유하는 것이 중요합니다.
YouTube 영상


